Assigning a public IP address to your Raspberry Pi can unlock numerous possibilities, from remote access to hosting servers. However, the process requires careful planning and execution to ensure security and functionality. Whether you're setting up a home server, running a media center, or enabling remote access to your Raspberry Pi, having a public IP address is essential. This guide will walk you through the steps to assign a public IP address to your Raspberry Pi while ensuring optimal performance and security.
As the Raspberry Pi continues to grow in popularity among hobbyists, developers, and professionals alike, understanding how to configure its networking settings becomes crucial. With a public IP address, you can access your Raspberry Pi from anywhere in the world, making it an ideal solution for remote monitoring, IoT projects, and more.
In this article, we will delve into the technical aspects of assigning a public IP address to your Raspberry Pi. We'll cover everything from understanding the basics of IP addresses to configuring your router and ensuring security. By the end of this guide, you'll have the knowledge and tools needed to successfully assign a public IP address to your Raspberry Pi.
Read also:Dstv Packages And Price
Table of Contents
- Understanding IP Addresses
- Raspberry Pi Overview
- Why Assign a Public IP to Raspberry Pi?
- Pre-requisites for Assigning Public IP
- Configuring Your Router
- Setting Up Port Forwarding
- Implementing Security Measures
- Using Dynamic DNS
- Testing Your Connection
- Troubleshooting Common Issues
Understanding IP Addresses
An IP address is a unique identifier assigned to each device connected to a network. There are two main types of IP addresses: private and public. Private IP addresses are used within local networks, such as your home or office, and are not accessible from the internet. Public IP addresses, on the other hand, are globally unique and allow devices to communicate over the internet.
Types of IP Addresses
Here’s a breakdown of the different types of IP addresses:
- Private IP Address: Assigned by your router and used for internal communication within your local network.
- Public IP Address: Assigned by your Internet Service Provider (ISP) and used for communication over the internet.
- Static IP Address: A fixed IP address that does not change.
- Dynamic IP Address: An IP address that changes periodically, assigned by your ISP.
Raspberry Pi Overview
The Raspberry Pi is a versatile, low-cost, single-board computer designed for a wide range of applications. It is commonly used for educational purposes, home automation, media centers, and even as a server. One of its key features is its ability to connect to the internet, making it an ideal candidate for projects that require remote access.
Key Features of Raspberry Pi
- Compact and affordable design
- Supports multiple operating systems
- Compatible with various peripherals
- Capable of running as a server or IoT device
Why Assign a Public IP to Raspberry Pi?
Assigning a public IP address to your Raspberry Pi enables remote access, allowing you to control and interact with your device from anywhere in the world. This is particularly useful for projects such as:
- Hosting a web server
- Running a media server
- Setting up a remote desktop
- Monitoring IoT devices
By assigning a public IP address, you can bypass the limitations of private IP addresses and take full advantage of the Raspberry Pi's capabilities.
Pre-requisites for Assigning Public IP
Before you begin, ensure you have the following:
Read also:Crescent University Nigeria
- A Raspberry Pi with the latest version of Raspberry Pi OS installed
- An active internet connection
- Access to your router's configuration page
- Basic knowledge of networking concepts
Having these prerequisites in place will make the process smoother and more efficient.
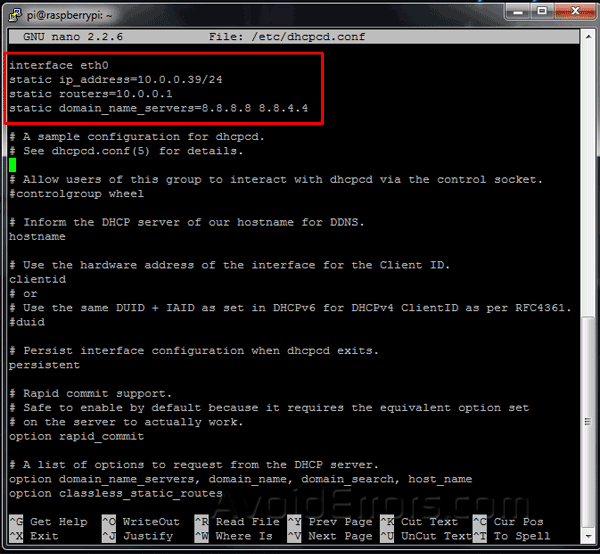
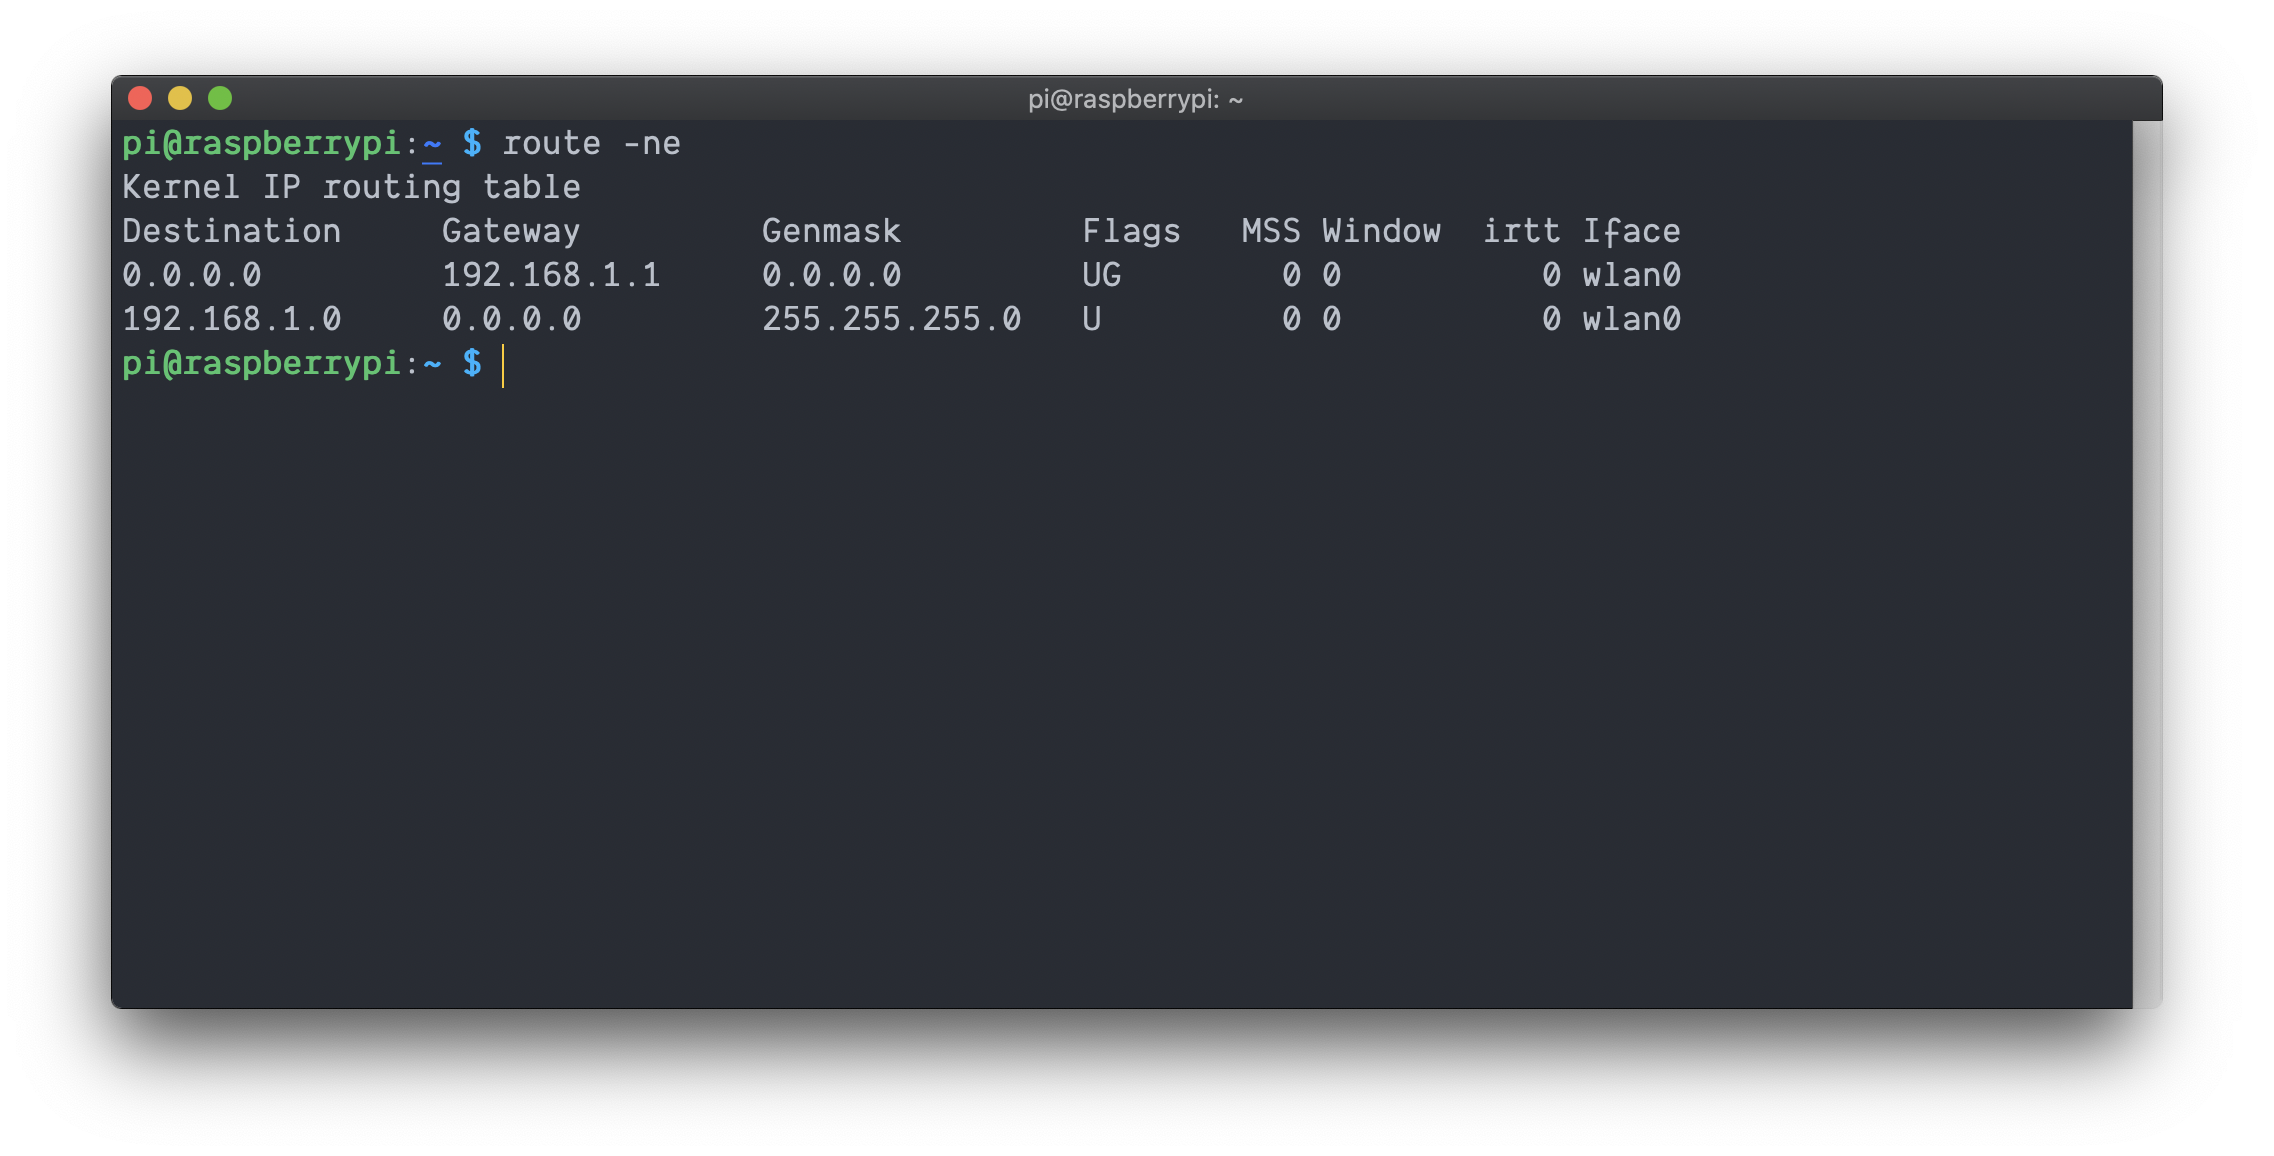
Configuring Your Router
Your router plays a crucial role in assigning a public IP address to your Raspberry Pi. To begin, log in to your router's configuration page and locate the DHCP settings. Here, you can assign a static IP address to your Raspberry Pi, ensuring it always uses the same private IP address on your local network.
Steps to Configure Router
- Connect to your router's configuration page using its default gateway IP address (e.g., 192.168.1.1).
- Log in with your router's credentials.
- Navigate to the DHCP or LAN settings section.
- Reserve an IP address for your Raspberry Pi by entering its MAC address.
Setting Up Port Forwarding
Port forwarding allows external devices to access your Raspberry Pi over the internet. To set up port forwarding:
- Identify the ports you want to forward (e.g., port 22 for SSH).
- Log in to your router's configuration page.
- Navigate to the port forwarding section.
- Enter the private IP address of your Raspberry Pi and the desired ports.
Port forwarding is essential for enabling remote access to your Raspberry Pi.
Implementing Security Measures
Assigning a public IP address to your Raspberry Pi exposes it to potential security risks. To mitigate these risks, implement the following security measures:
- Use strong passwords and enable two-factor authentication.
- Keep your Raspberry Pi's software and firmware up to date.
- Install a firewall to block unauthorized access.
- Use a secure connection protocol, such as SSH, for remote access.
By taking these precautions, you can ensure the security of your Raspberry Pi and protect it from potential threats.
Using Dynamic DNS
If your ISP assigns a dynamic public IP address, consider using a Dynamic DNS (DDNS) service. DDNS updates your domain name with your current public IP address, allowing you to access your Raspberry Pi even if your IP changes.
Popular DDNS Services
- No-IP
- Dynu
- Duck DNS
These services offer free and paid plans, depending on your needs and preferences.
Testing Your Connection
Once you've completed the setup, test your connection to ensure everything is working correctly. You can do this by:
- Attempting to connect to your Raspberry Pi using its public IP address from another device.
- Using tools like Ping or Telnet to verify connectivity.
- Accessing any services or applications running on your Raspberry Pi.
Testing your connection will help identify and resolve any issues before they become problematic.
Troubleshooting Common Issues
Despite careful planning, issues may arise during the setup process. Here are some common problems and their solutions:
- Unable to connect: Double-check your router settings and ensure port forwarding is correctly configured.
- IP address changes: Use a DDNS service to handle dynamic IP changes.
- Security alerts: Review your firewall rules and ensure only necessary ports are open.
By addressing these issues promptly, you can ensure a smooth and successful setup.
Conclusion
Assigning a public IP address to your Raspberry Pi opens up a world of possibilities, from remote access to hosting servers. By following the steps outlined in this guide, you can successfully configure your Raspberry Pi for public access while ensuring security and stability.
We encourage you to share your experience in the comments below and explore other articles on our website for more Raspberry Pi tips and tricks. Remember, knowledge is power, and with the right tools and guidance, you can unlock the full potential of your Raspberry Pi.